3.7. Basic LinuxCNC Usage
During the development of the testbed, three LinuxCNC configurations were created:
mesa_7i96s_7i77_xy: Simulates a robot with X and Y axes, where the brushless motor controls the X-axis and the stepper motor controls the Y-axis.mesa_7i96s_7i77_xx: Simulates a robot with a single X-axis, where both the brushless and stepper motors control the axis simultaneously, moving synchronously at the same speed.mesa_7i96s_7i77_xc: Simulates a robot with an X-axis and a C-axis (rotation around the Z-axis). The brushless motor controls the X-axis, and the stepper motor controls the C-axis.
The following sections explain how to use LinuxCNC with these configurations.
3.7.1. Control using the AXIS Graphical Interface
When LinuxCNC is launched with one of the aforementioned configurations, the AXIS graphical interface will open, as shown in Fig. 23. The process for controlling the machine with this interface is detailed below.
3.7.1.1. Setting LinuxCNC to the “ON” State
The initial state of LinuxCNC will be “ESTOP” (emergency stop), indicated at the bottom left of the window, thus disabling robot movement. To start the robot, you must first clear the “ESTOP” condition. To do this, proceed as follows:
Deactivate the physical emergency stop switch (see Fig. 2). If this switch is active, it forces the emergency stop state in LinuxCNC.
Deactivate the emergency stop state in LinuxCNC by pressing the
 button.
Once the emergency stop state is deactivated, LinuxCNC will transition to the “OFF” state, and the start button will change from a deactivated state ( ) to an activated state (
 ).
To begin using the robot, press this button, which will transition LinuxCNC to the “ON” state. Fig. 24 shows the AXIS interface in the “ON” state.
).
To begin using the robot, press this button, which will transition LinuxCNC to the “ON” state. Fig. 24 shows the AXIS interface in the “ON” state.

Fig. 24 LinuxCNC “AXIS” graphical interface in “ON” state.
3.7.1.2. Homing the Machine
Once LinuxCNC is in the “ON” state, you can manually control the machine using the - and + controls on the “Manual Control” tab. However, to execute specific G-code positioning commands (e.g., moving the machine to X=1, Y=5), it is necessary to perform the homing process. The homing procedure involves establishing a precise reference point for all machine axes, providing LinuxCNC with exact knowledge of the machine’s current position.
To perform the homing process, you can click the Home All button on the “Manual Control” tab or select the menu entry . In the testbed configurations, the homing process uses a single limit switch per motor. The procedure LinuxCNC follows for homing with limit switches is as follows:
Move the motor towards the limit switch until it is activated.
Move the motor in the opposite direction until the limit switch is deactivated.
Move the motor again towards the limit switch until it is activated, this time at a slower speed to precisely locate the switch’s position.
Move the motor to the designated home reference position.
In the mesa_7i96s_7i77_xy and mesa_7i96s_7i77_xx configurations, you must manually activate the limit switches for both motors. In the mesa_7i96s_7i77_xc configuration, only the brushless motor’s limit switch needs manual activation; the stepper motor in this case uses a different homing process that simply seeks the encoder’s index pulse position.
Fig. 25 shows the interface window after the homing process is complete. The  symbol can now be seen next to the X and Y axis information in the display area, indicating that the axes are homed.
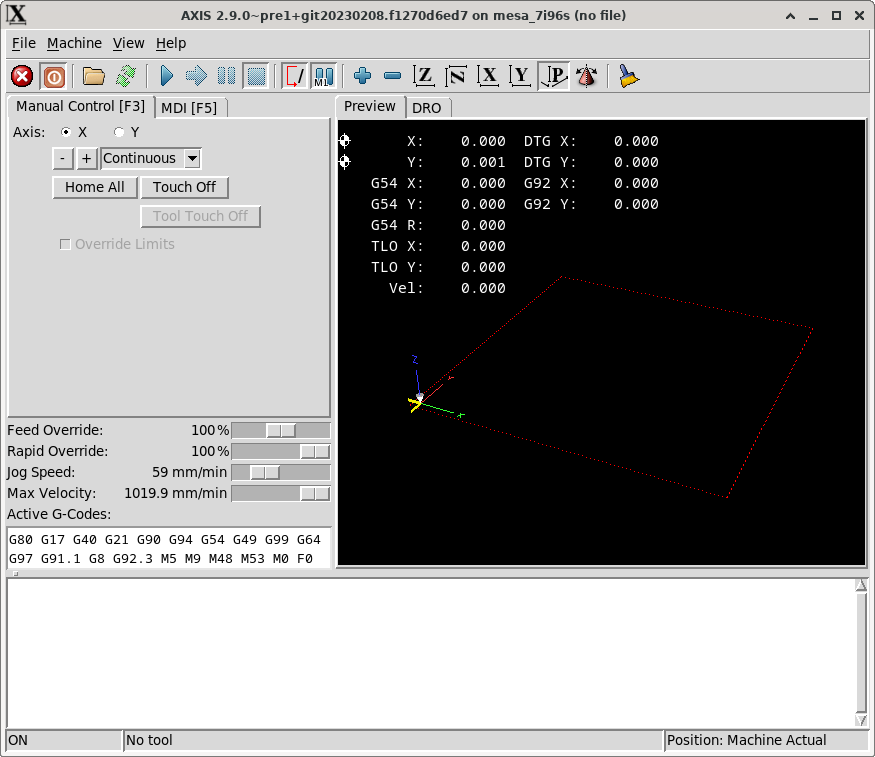
Fig. 25 LinuxCNC “AXIS” graphical interface in “ON” state with all axes homed.
3.7.1.3. Controlling the Machine
As mentioned in Section 3.6.4, LinuxCNC offers three control modes: manual, MDI, and automatic. The AXIS interface allows controlling the machine using these modes as follows:
Manual mode: You can control the machine manually via the - and + controls on the “Manual Control” tab.
MDI mode: You can use MDI mode via the “MDI” tab, where G-code commands can be entered line by line.
Automatic mode: You can load a G-code program from a file by clicking on and then execute it in automatic mode by clicking the
 button or pressing the R key.
For more information on G-code control, consult the “G-code programming” section in the LinuxCNC manual [lin23].
3.7.2. Programmatic Control
LinuxCNC can be controlled programmatically by including a sequence of instructions in two ways:
Using G-code programs stored in a file, as mentioned in the previous section.
Using Python programs with the
linuxcnclibrary, which is included with LinuxCNC and allows interaction with the running LinuxCNC process. For more information, consult the “Python Interface” section in the LinuxCNC user manual. Listing 5 provides an example of robot control using Python by sending G-code commands in MDI mode.
#!/usr/bin/env python3
# Example of LinuxCNC control with Python
# See the LinucCNC user manual, section 13.5 - Python Interface

import sys
import linuxcnc


def control_robot(c: linuxcnc.command) -> None:
    def set_feed_rate(v: float):
        # set robot feed rate
        c.mdi(f"F{v}")
        c.wait_complete()

    def go_to(x: float, y: float):
        # go to position (x, y)
        print(f"Going to ({x}, {y})...", end="", flush=True)
        c.mdi(f"G1 X{x} Y{y}")
        while (ret := c.wait_complete(1)) == -1:
            continue
        print(" done")
        if ret == linuxcnc.RCS_ERROR:
            print("RCS_ERROR")

    # Put your robot commands here
    set_feed_rate(400)
    go_to(0, 0)


def main():
    s = linuxcnc.stat()  # connect to the status channel
    c = linuxcnc.command()  # connect to the command channel

    def ok_for_mdi() -> bool:
        s.poll()
        return (
            not s.estop
            and s.enabled
            and (s.homed.count(1) == s.joints)
            and (s.interp_state == linuxcnc.INTERP_IDLE)
        )

    if ok_for_mdi():
        c.mode(linuxcnc.MODE_MDI)
        c.wait_complete()  # wait until mode switch executed
        print("OK, running...")
        try:
            control_robot(c)
        except KeyboardInterrupt:
            c.abort()
            sys.exit(1)
    else:
        print("Not OK for running. Check that the robot is homed and idle.")
        sys.exit(1)


if __name__ == "__main__":
    try:
        main()
    except linuxcnc.error as e:
        print("error: ", e)
        print("is LinuxCNC running?")
        sys.exit(1)